
The GT6 began when in 1963 Triumph were considering extending their range of cars. Following a discussion between Michellotti and Triumphs technical director regarding designing a fastback body for the popular Spitfire, a spitfire was delivered to Michellotti in Turin.
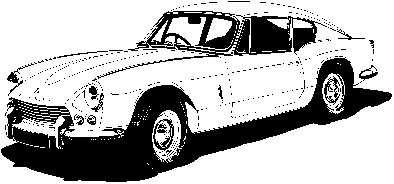
Later that year the car was finished and returned to triumph, christened the Spitfire GT. His design added too much weight to the car so the idea was shelved but not forgotten and in 1964 the Spitfire GT project became official policy . The decision to turn it into a six-cylinder car was the result of progress with the up-grading of the Vitesse to a 1998cc. It was a bit of a squeeze getting the 1998cc six-cylinder engine into the Spitfire’s engine bay, but by creating a rather complicated cooling system and a large bonnet bulge they managed it. Assembly of the production cars commenced in July 1966 and by 1967 the build rate had steadied at 500-600 cars per month.
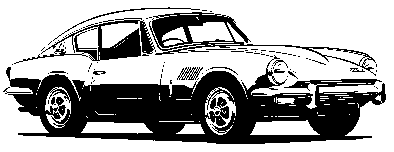
In Autumn 1968 the GT6 Mk2 was introduced (known as the GT6+ in the US), it had revised body styling incorporating a raised front bumper and the rear over riders had now been removed The car was also fitted with an advanced rear suspension layout.
This used a reversed lower-wishbone with double-jointed drive shafts, reducing camber change from 21 deg to 7 deg 20 mins. The effect on the handling of the GT6 was very impressive. The Mk2 also acquired a new cylinder head, borrowed from the TR5, together with a revised camshaft profile this resulting in an increase of bhp from 95 @ 5000rpm to 104 @ 5300rpm. In 1970 the Mk2 was given a face lift this included new reclining seats, matt black facia surround, new steering wheel and badges.
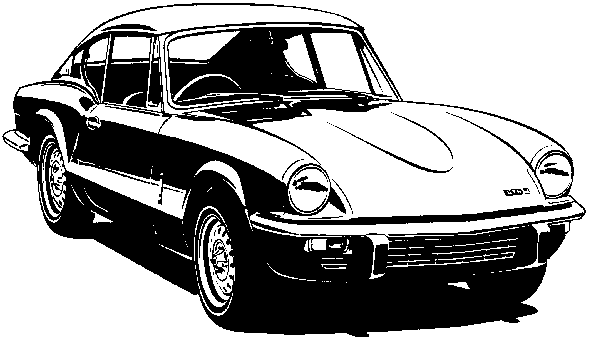
In November 1970 the GT6 Mk3 was launched . In line with the Spitfire MkIV, the tail was “chopped-off” and the bonnet flattened out. The rear roof line of the GT6 was altered and the petrol cap and door handles ceased to protrude. The US market being the largest customer was all important to Triumph and in 1972 to meet US emission regulations the US specification cars saw a change in carburettor, piston, ignition, distributor and camshaft design reducing the cars power to 95bhp.
In 1973 the GT6 was face lifted, new fabric upholstery, new style intruments and for the European market servo assisted brakes and “sundym” glass. The US specification cars emission control was also further controlled bringing the power output down to just 79bhp, little more that the UK spitfire. All this extra cost on the car meant the car was now not so competitive so the advance rear suspension was converted back to the old swing axle type to keep the car comparable with its nearest rival the MGBGT. Optimism was high in the sales department but in reality the bell was tolling. The safety legislation enforced by the US market meant a considerable increase in weight – the exhaust emission regulations badly affected the power of the six-cylinder engine and sales dropped…and dropped.
No official death certificate was released but on the thirtieth of November 1973 the last two GT6s produced quietly left the factory.
The engine has the fairly solid block, but has problems with low oil flow to the valve gear. Listen for excess rattle around the valve gear when the engine is warm; it might mean some work is needed. If possible check the compression, it should be in the 175-185 range (cold).
This is the car’s main problem area. Listen for excess noise and feel for worn synchros. If you suspect problems here you can nearly guarantee that a new\recon box will be required.
The selector linkage also suffers from worn bushes which can make gear selection awkward. Suspension / driveshafts:
If the car is a Rotoflex car check the state of the rotoflex couplings (look for cracks in the rubber donuts), if these let go they tend to destroy the stub driveshafts – can be expensive!
Listen for excessive differential noise.
Listen for universal joint clunks. Expect that at least one U joint will be loose and want replacement. These are all fairly cheap and available, but a pain to install. Same for all the rubber bits in the suspension. Worn rear radius arm bushings, especially, will cause slightly weird handling over bumps.
Check the steering rack gaiters for tears and the rack mounting bushings for play. Overdrive:
If it works, great. If it doesn’t, you’re probably looking at a replacement.
Body work is more expensive than mechanical work. So you want as rust free a car as possible. If the car has already been restored check for filler and painted over rust with a magnet. Probably the most important thing is the bulkhead; the car relies on this for structural strength. Look to see if the transmission cover mates well; if it doesn’t, you’ll get heat and fumes into the passenger compartment.
Check the battery box area and the floor underneath it – your usual owner will replace the battery box only after it has caused severe rust on the floor under it.
Check the rear shock mountings to the body on Mk2’s and Early Mk3’s. Check for chrome trim: there should be trim strips along the front and rear wings on Mk1’s and 2’s and rear wing only on Mk3’s. Check for bonnet shake and the integrity of the rubber seals at the rear of the bonnet and the inner wheel Arches.
The chassis is a main spine with outriggers. Check the outriggers for rust; they provide most of the transverse strength of the car. Check the rear frame members for rust.
Unless the optional Servo is fitted; before writing off the brakes as weak, make sure the rears have been adjusted.
Look for leaks around the master cylinders.